Sunday, May 3, 2020

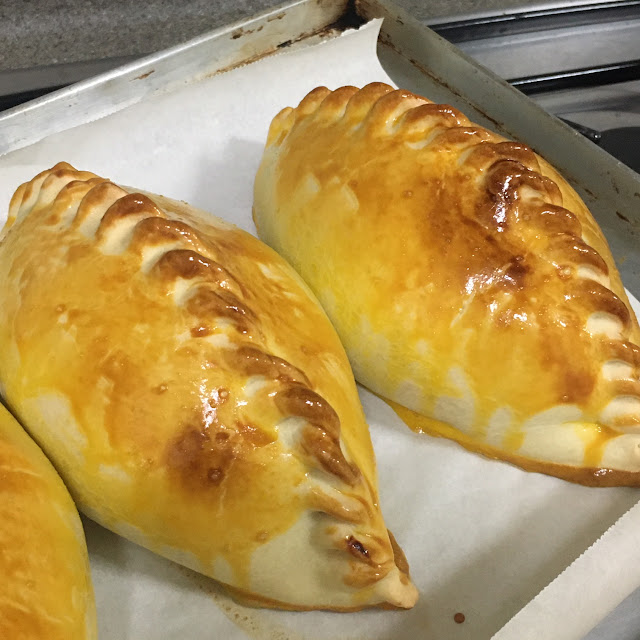
Chicken Cornish


Ingredients
Pastry
250g cold butter (or half butter + half ghee)
500g plain flour
a pinch of salt
ice water ~ 300ml
1-2 eggs yolks
italian herbs (optional because I don't have lah)

Filling
  • boiled or grilled chicken breast (can also replace with sausage) then cut to cube
  • cubed potato
  • cubed carrot
  • chopped onion
  • chopped garlic
  • ginger powder
  • curry powder
  • chili powder 
  • pepper and salt to taste
  • oil
Directions
Filling
  • prepare the filling first and let it cool
  • same like preparing curry potato lah
  • I cook like epok2 filling but just add the chicken and carrot hehe
Pastry
  • rub in cubed butter to flour & salt till it form breadcrumbs
  • add ice water in batches till it formed a soft smooth dough
  • leave the dough to rest covered for at least 30 minutes
  • roll flat and make just like super huge curry puff or epok2
  • place the cornish on parchment paper and brush it with egg yolk before baking
  • if you have italian herbs, sprinkle on the cornish (too bad I don't have... oh well)
  • bake for 35-40 minutes at 170°C

Foodnote: My niece told me she misses the Chicken Cornish from Secret Recipe. Sooo... this is my attempt to make one but this one is "Ciklin's Recipe" hee hee... 

Friday, May 1, 2020

Instant Puff


Ingredients
instant roti prata (I use Springhome)
whisked egg

fillings
curry potato or sardines or sambal ikan bilis etc
chopped fruits also can

Directions
  • pre-heat oven to 170°C
  • cut the instant prata into half
  • place fillings on the dough and fold into two
  • use a fork to pinch the open ends
  • place on baking tray lined with parchment paper
  • brush the top with egg generously
  • bake for about 20min or so till puff is golden and crispy

Foodnote: This is a simple recipe to make and it is yummy. Good to make when you have leftover sardins or potato curry etc. or you just need a fast snack to serve guests.

Wednesday, April 29, 2020

Roti Jala / Roti Kirai


Ingredients
1 egg
2 cups plain flour
2/3 can evaporated milk
pinch of salt
turmeric or yellow colouring
~1.5 cup of water

Directions
  • whisk egg, salt and evaporated milk together
  • add sifted flour and whisk till no more lumps
  • add water to dilute the mixture
  • test the consistency using the mould. The liquid should be watery enough that the mixture flow in a fine stream and not droplets (too thick)
  • heat flat pan and wipe/brush lightly with oil
  • scoop mixture with mould and swiftly make a circular motion on the pan
  • when the top layer is cooked through, fold into half and fold to form cone shape

Foodnote: Another one of my favourite food. Super yummy to eat with chicken or mutton curry and top up with sambal tumis. It is nicer if the string is thinner. Some amake this with curry potato filling but I prefer as is and just dip in thick curry gravy nom nom nom.

Thursday, April 23, 2020

Roti Kering


Ingredients
bread (leftover or stale one also can)
sugar
butter

Directions
  • spread butter on bread, cut into smaller desired sizes and sprinkle with sugar
  • if using other than loaf, cut the bread thinly and to desired size
  • arrange on baking tray and bake at 120°C for about 20min till bread is crispy
  • that's all... can keep in airtight container for quite long

Foodnote: Just a childhood snack that I love. Made it for my niece who will be spending a lot of time at home due to the Circuit Breaker period. Even I can't stop popping it into my mouth huhu.

Churros


Ingredients
150ml water
40g unsalted butter
20g sugar
110g all-purpose flour
2 eggs
oil for frying

fine sugar + cinnamon powder for coating (optional)

Chocolate sauce
4g corn starch
10g water

50g dark chocolate
25g sugar
150ml milk

Directions
  • in a small pot, heat water, sugar and butter till boiling and sugar dissolves
  • lower the heat and pour sifted flour into the mixture and stir with a spatula till you get a ball of dough
  • move the pan to a table, spread the dough thinly and leave it to cool for about 10-15mins
  • add one egg at a time and mix till you get a soft dough
  • fill dough into piping bag with a star nozzle
  • pipe the churros on cut up parchment papers for easy frying
  • put the churros together with the parchment paper into oil to fry and promptly remove the parchment paper... 
  • fry till crispy and dark golden
  • (optional) once fried, cover the churros in sugar+cinnamon mixture
Chocolate sauce
  • mix the corn starch with water in a small bowl
  • in a pan, heat the rest of the ingredients, dark chocolate, milk and sugar till all combined and sugar dissolves
  • add in the corn starch mixture and keep stirring till chocolate sauce thickens
  • dip churros into chocolate sauce and enjoy

Foodnote: It is just an impromptu decision to try and make churros for the niece. I just use the available nozzle. It was nice... chocolate sauce will be nicer if I am more patient and let it thicken further. The churros also need to fry a bit longer so that it will be crispier. Overall... quite satisfied.

Thursday, April 9, 2020

Japanese Cotton Cheese Cake


Ingredients
Group A
60g full cream milk
140g cream cheese
40g butter

Group B
50g plain flour
15g corn flour or corn starch
5 egg yolks

Group C
5 egg whites
100g caster sugar

Direction
  • prepare ingredients and put aside
  • pre-heat oven to 120°C with a tray of water about 1cm deep (to bake in waterbath)
  • put all Group A in a stainless steel pan and using low fire, whisk all ingredients till creamy and quickly remove from stove
  • add in flour and corn starch mix... followed by yolk and slowly use whisk to mix till smooth
  • using a mixer with balloon attachment, whisk egg whites till bubby
  • add in sugar in 3 batches till firm peak is formed
  • scoop some egg whites meringue to flour mixture and slowly mix together with whisk till even
  • transfer into a bigger bowl, scoop half egg whites and slowly mix again followed by the last batch use spatula to fold in till smooth and even
  • pour to 7" pan (I only have 6" so can split into 2 pans)
  • use a stick to run around the batter to remove any big bubbles
  • put pan in waterbath and bake for 20min at 120°C
  • after 20min, increase the heat to 150°C and bake for another 15min
  • switch off the oven and leave the cake in oven to cool for 10min
  • remove from oven and remove cake from the pan
  • yummy... nom nom nom... easy peasy

Foodnote: I happen to have all the ingredients and have always wanted to make jiggly cotton cheese cake. Use this recipe here. It is so easy and I didn't expect that it will turn out so well. So happy me happy tummy.


Monday, April 6, 2020

Soon Kueh


Ingredients
Soon Kueh Skin
100g wheat starch
25g tapioca starch
150g water (100°C)
15g oil
1g salt

Fillings
TBA

Garnishes
crispy fried shallots
chopped spring onion
chopped coriander leaves or spring onion
sambal
sweet soya sauce

Directions
Filling
  • TBA
Dumplings
  • put both flour together in a bowl
  • combine water, oil and salt in a pan and cover the top with stainless steel bowl (to prevent evaporation) and bring to a boil
  • once the water get into rolling boil, add the flour and quickly keep stirring using a wooden spatula till all floor absorbed the water evenly
  • remove the dough to a working surface and keep kneading till dough is even, smooth and springy
  • put the dough under a covered bowl to prevent drying
  • prepare a plate and glaze it with oil (preferably onion+garlic+ginger oil)
  • take a small piece of dough and use a rolling pin to roll thin
  • use a round cutter (I just use a small bowl) to cut round shape, fill with fillings, fold over and pinch the edges together to form half circle
  • place on the prepared plate and steam for 10-12min ... you should be able to smell the fragrant of the dumpling when it is ready (do not open the steamer cover too early to check)
  • immediately after removed from the steamer, glaze each soon kueh with oil
  • add garnishes and eat with sambal and dark sweet sauce... yummm

    Foodnote: Actually this recipe is similar to the dumpling but with slightly more oil. Texture is nice, soft and chewy. It is quite easy to make so will definitely be making this again from time to time.

    To freeze: keep raw soon kueh uncovered in the fridge on a tray for 1-2hr. Transfer to a covered container. When it is ready to be consumed, steam from frozen.

    Sunday, March 29, 2020

    Hong Kong Style Crystal Dumpling / Har Gow


    Ingredients
    Dumpling Skin
    100g wheat starch
    25g tapioca starch
    150g water (100°C)
    5g oil
    1g salt

    Meat Fillings
    600g meat (chicken + prawn or fish paste)
    3-6g salt (3g for sweet, 6g for savory)
    18g sugar
    1-2g white pepper powder
    10g sesame oil
    optional ingredients: chopped waterchestnut (soaked in sugar water for 10min), shallot, garlic, mushrooms, spring onion or mushroom seasoning (MSG)

    Garnishes
    chopped shallots
    sliced garlic + light soya sauce
    crispy fried shallots
    fried peanut and crispy anchovies
    chopped spring onion
    chopped coriander leaves
    potato chips (yes... potato chips)
    chopped red chillies (to add last so that the color will stands out

    Green Tea Skin: add 5g matcha powder to the flour
    Charcoal Skin: add 2g charcoal powder to the flour
    Other colors: add the liquid colourings to the boiling water
    Soon Kueh: the skin can also be used for soon kueh. Increase the oil to 15g

    Directions
    Meat Filling
    • chop meat into very small pieces
    • add all other ingredients together (best to use a mixer), spread on a tray and keep in the fridge until ready to use
    • proportions of ingredients can be adjusted to taste (yes taste the raw ingredients... won't die one)
    Dumplings
    • put both flour together in a bowl
    • combine water, oil and salt in a pan and cover the top with stainless steel bowl (to prevent evaporation) and bring to a boil
    • once the water get into rolling boil, add the flour and quickly keep stirring using a wooden spatula till all floor absorbed the water evenly
    • remove the dough to a working surface and keep kneading till dough is even, smooth and springy
    • put the dough under a covered bowl to prevent drying
    • prepare a plate and glaze it with oil (preferably onion+garlic+ginger oil)
    • take a small piece of dough and use a rolling pin to roll thin
    • use a round cutter (I use a small bowl) to cut round shape, fill with meat fillings and pinch the edges together to form hargow dumpling (refer to here @ 6.5min on how to pinch the edges of the har gow)
    • place on the prepared plate and steam for 10-12min ... you should be able to smell the fragrant of the dumpling when it is ready (do not open the steamer cover too early to check)
    • immediately after removed from the steamer, glaze each dumpling with oil
    • add garnishes for presentation and to enhance the taste

    Foodnote: I love dim sum and am glad to have the opportunity to learn how to make this myself. The taste is really awesome and the garnishes together with the dim sum really makes the taste super awesome. Looking forward to the next baked dim sum class (Basic). Hopefully after Hari Raya, I will definitely want to continue with the intermediate class and learn more dim sum dishes.

    To freeze: keep raw dumplings uncovered in the fridge on a tray for 1-2hr. Transfer to a covered container. When it is ready to be consumed, steam from frozen.
    Related Posts Plugin for WordPress, Blogger...